How to Build your No-code App in Steps
![]() As a Product Manager, I always enjoy the process of crafting products that can enhance people’s lives. Yet, as someone without a technical background, I often find myself struggling building a technical product without an engineer.
As a Product Manager, I always enjoy the process of crafting products that can enhance people’s lives. Yet, as someone without a technical background, I often find myself struggling building a technical product without an engineer.
Fortunately, the emergence of no-code and low-code app builders like Coda, Glide, and FlutterFlow has been a game-changer, allowing me to overcome my weaknesses to experiment in developing simple technical products.
In this post, I’ll walk you through my journey of building a Leave Tracker App using the low-code tool Coda, providing a step-by-step guide for anyone interested in doing the same.
Introducing Coda.io
Coda is a powerful tool that seamlessly integrates the functionalities of spreadsheets, documents, and databases. I opted for Coda due to its versatility and the fact that we already use it at Holistics for internal processes.

If you’re new to Coda, working with its formulas might seem a bit challenging at first. However, once you get familiar with them, Coda proves to be a proficient platform for handling app logic effectively.
Understanding the Basics of Building a Technical App
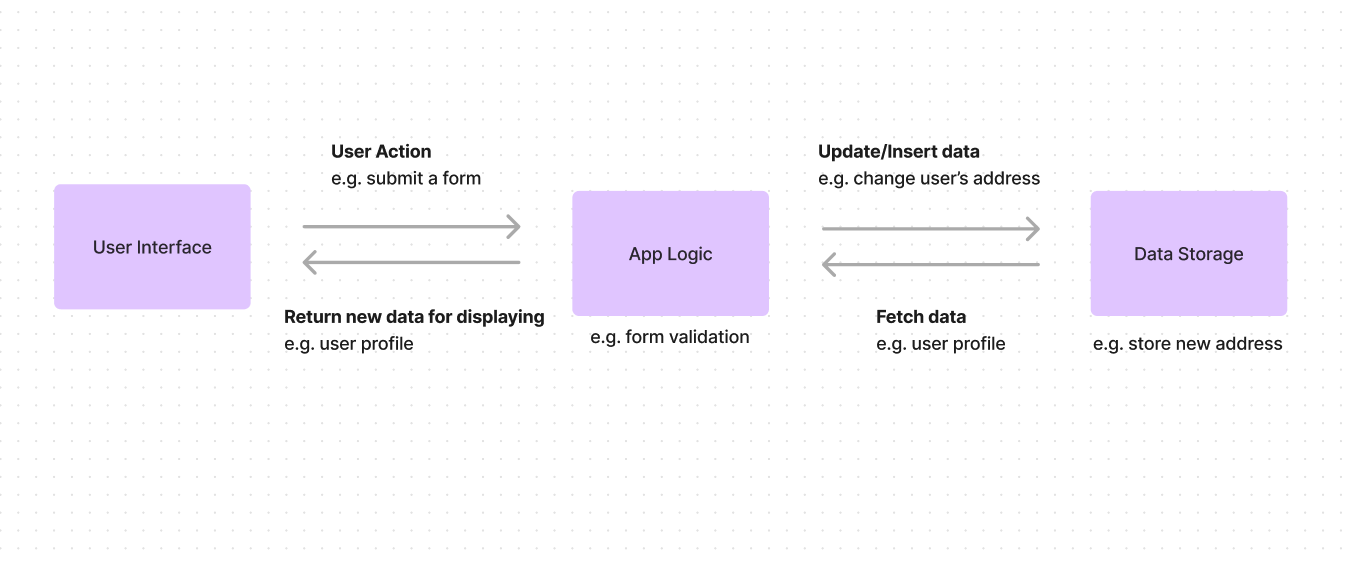
Before delving into app development, it’s beneficial to grasp the fundamental components of a technical app. Generally, an app simply has three main components:
- Data Storage: This is where the app stores its information, such as user preferences, settings, or any data generated by the app itself. Common options include databases, local storage on the device, or cloud storage.
- App Logic: This is the “brain” of the app, responsible for processing user input, performing calculations, and making decisions that control the app’s behavior.
- User Interface (UI): This is the visual layer that users interact with. It includes all the buttons, menus, screens, and other elements users see and use to control the app.

While these are core components, the specific implementation and complexity can vary greatly depending on the app’s functionality. Simple apps might have less data to store or simpler logic, while others might involve intricate data structures and advanced programming. Some apps might even have additional components, like a special layer to talk to other servers or security features to keep your data safe.
In no-code and low-code platforms like Coda, we leverage its tables for data storage, formulas for app logic, and the platform itself for UI design.
Let’s Dive In!
Now that we have a foundational understanding, let’s embark on building our Leave Tracking App using Coda. Here’s a simplified breakdown of the process:
- Defining the core functionalities
- Mapping the User Flow
- Developing the UML
- Crafting the Database Structure
- Build the App Logic and UI in Coda
Step 1: Defining the Core Requirements
The first step in building any app is to clearly define the key functions it should perform. Think about what your app should be able to do and list them out. If you end up listing a bunch of things, take a better look and ask yourself if this is the core functions of your app. For example, in a to-do list app, key functionalities revolve around task management, such as creating, editing, and completing tasks.
In the context of a Leave Tracking App, the core requirements should be:
- For Employees:
- Can submit/withdraw their leave request
- Can’t request more leave than their remaining days
- For Managers:
- Can get notified when there is a new request waiting for approval
- Can approve/reject a leave request
We may explore additional features in later stages, such as:
- Employees updating leave requests.
- Tracking leave balance and history for both employees and managers.
Step 2: Mapping the User Flow
With all the requirements defined, it’s time to envision how users will navigate through our app, known as the User Flow. This entails charting every step they’ll take, along with potential scenarios they might encounter. Remember, the more detailed our flow, the easier we can develop our app.
Below is a simple user flow I’ve created for the Leave Tracker App, using Lucidchart. However, you can use any preferred diagram tools, such as FlowMap, Miro, or Figjam, to visualize the user journey.
![]()
Step 3: Developing the UML
Use Case Diagram (UML) is like a picture that shows how different parts of our app work together. It uses simple symbols and shapes to represent things like what the app does, how people use it, and how different parts of the app talk to each other.
During the app-building journey, we use UML diagram to visualize how the app would work and identify any potential issues before starting to build. Given the above core functionalities and user flow, I’ve crafted a UML diagram tailored specifically for the Leave Tracker App:
![]()
Step 4: Crafting the Database Structure
After planning out every possible scenario for the main use cases, it’s time to determine what sort of data we would need to keep.
In the context of the Leave Tracker App, we’ll need four main tables to store the following essential information:
- leave_users: A table to store the user’s information, including their name, email, managers, etc.
- leave_policies: A table to store the leave policy of the company, determining the number of leave types and leave days an employee has
- leave_event: A table to store the leave request information, such as the created time, leave reason, approval status, etc.
- leave_management: A table to store the leave history and balance of users
With the UML in hand, I used dbdiagram.io, a free online tool for drawing entity-relationship diagrams, to quickly design the database structure for my Leave Tracker.
Step 5: Building the App with Coda
With all the ingredients in place, it’s time to step into the role of a master chef and start bringing our creation to life in Coda. The process was straightforward and intuitive:
- Build the four main database tables
- Connect these tables together and build the App Logic using the Coda’s table relations and formulas
- Create the user interface (UI) for employees to fill the leave request, by creating a Form View on top of the leave_event table
Since it would be challenging to cover all the details of how I built the table relationship and app logic using Coda formulas in this post, I highly recommend you explore their public documentation and give Coda a try. You’ll find that the tool is quite user-friendly, and there are many resources available to help you get started.
![]()
Celebrating The Result
With all the hard work done, I’ve finally got a simple Leave Tracker App in Coda. The app operates seamlessly, providing employees with a convenient platform to submit their leave requests through a user-friendly form. Meanwhile, managers can efficiently oversee and manage all incoming requests, streamlining the process for everyone involved.ts of my labor. The Leave Tracker app I built with Coda is now up and running, making it easy for employees to submit their leave requests and for managers to approve or reject them.
![]()
Final Words
As I reflect on the process of building a no-code app using Coda, I can’t help but feel a sense of excitement and accomplishment. Despite being a non-technical product manager, diving into app development has been a delightful journey. More than just creating a digital tool, it has been an opportunity to unleash creativity, refine problem-solving skills, and ignite a passion for innovation.